DHT11 Sensor with ESP-NOW and ESP32
In this project, we intend to use ESP32 board and Wemos board with ESP8266 chip to send temperature values from ESP32 board to Wemos board using ESP-NOW protocol. Also in this project, we will send the temperature and humidity values from the DHT11 sensor to the another ESP board without using internet. So lets quickly see how to wire up DHT11 Sensor with ESP-NOW and ESP32 quickly.
Material Required
- ESP32 Board x 1 [BEST BUY]
- WeMOS D1 Mini x 1 [Best Buy]
- DHT11 Sensor x 1 [BEST BUY]
- Jumper Cables [BEST BUY]
What is ESP-Now Protocol?
ESP-NOW is a wireless communication protocol developed by Espressif and capable of packet transmission. This protocol enables multiple devices to easily talk to each other and transfer information optimally between each other. This protocol is similar to the 2.4 GHz wireless connection, often used in wireless mice. Therefore, it is necessary to pair the devices before communicating. This means that the connection is stable after the devices are paired with each other. In other words, if one of your ESPs suddenly shuts down or resets, the connection is established automatically when you restart.
Advantages:
- Data transfer up to 250 bytes
- Benefit from encrypted communication
- It works everywhere. It does not require a router or a DHCP server.
-
Use Call Back to inform different layers if data transfer is successful or not
Disadvantages:
- Maximum limit of 250 payload bytes.
- Support for 10 encrypted SoftAPs only
- Maximum number of backups in unencrypted mode is 20
WeMOS D1 Wi-Fi Board
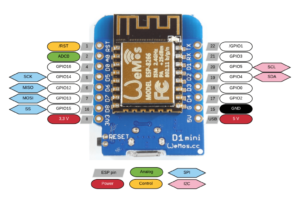
WeMOS D1 board is one of the most popular boards used in the field of IoT, one of the advantages of this board compared to boards such as Node MCU is its small size. The Wi-Fi chip used in this board is ESP8266. Another advantage of this board is the existence of various shields for this board, which makes any project very easy and enjoyable for the user, shields such as battery shield, multi sensor, DHT22, relay, oled, a large number The shield has been developed for this board, which will leave you with a good IoT experience.
DHT11 Sensor

A variety of sensors are designed and manufactured to measure temperature and humidity. Each has a different range and sensitivity. The DHT11 sensor is one of the best sensors for measuring temperature and humidity. These sensors consist of two parts, capacitive humidity and a heat resistor. There is also an analog-to-digital converter unit in the DHT11, which generates digital output. With the help of this converter, the user can use it in microcontrollers to read values.
ESP32 Board
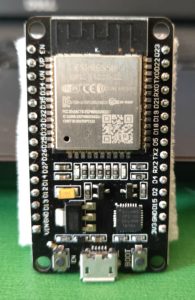
ESP32 is the advanced generation of ESP8266. One of the differences is its built-in Bluetooth capability. It also has a 2.4 GHz Wi-Fi and built-in Bluetooth with 40-nanometer technology from TSMC. This module has the best performance in energy consumption, which helps us to get best results from least energy consumption. If we want to take a closer look at this board is also called System on a chip (SoC) microcontrollers.
Working of this Project

We are using DHT11 sensor to capture the temperature and humidity data. ESP32 board will be the sender and WeMOS D1 mini is the receiver. The ESP32 board will obtain the temperature and humidity values and send them to the Wemos board via the ESP-NOW protocol.
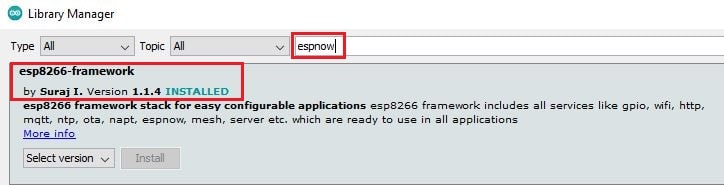
Installing Libraries
For this tutorial you need some Libraries in order to make the code working. Go to Sketch -> Include Library -> Manage Libraries. Search for the word “espnow” and install the library.
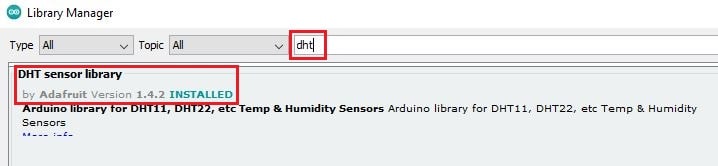
Now we need to install DHT sensor library and for that we need to type DHT and install it.
Finding MAC Address
Before we learn how to get these MAC addresses, it is better to learn the meaning and concept of MAC addresses and why they exist? Well, if a device is trying to connect to the Internet, it will be assigned with two addresses. First an IP address which is a logical address and then the MAC address, which is the physical address of our device. This MAC address us also know as a fingerprint.
The expansion of MAC is Media Access Control. MAC addresses consist of 48 bits with hexadecimal digits and are found with a structure like this xx: xx: xx: xx: xx: xx. Each xx is equal to 8 bits or one byte. The first 24 bits are specified by the manufacturer of the device and the second 24 bits of devices that can be numbered.
To communicate between ESP32 boards, we need to know the MAC address of other boards. In the process of transferring data or pairing each board, it checks the identity of the other board. Each ESP board has its own MAC address to authenticate. To get this MAC address, upload the following code in your WeMOS D1 mini. If you are not sure how to upload code in WeMOS D1 mini then you can refer to this article.
#ifdef ESP32
#include <WiFi.h>
#else
#include <ESP8266WiFi.h>
#endif
void setup(){
Serial.begin(115200);
Serial.println();
Serial.print("ESP Board MAC Address: ");
Serial.println(WiFi.macAddress());
}

void loop(){
}
After uploading the code, reset your WeMOS D1 to see your MAC address in Arduino IDE serial monitor.
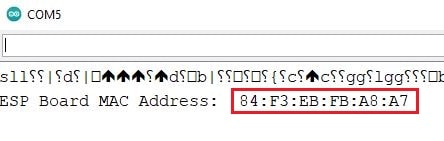
Copy it and save the MAC address as we need it further. In transmitter code, we must specify the MAC address of the WeMOS D1 mini.
//Replace it with your ESP's MAC address in the transmitter code
uint8_t broadcastAddress1[] = {0xAA,0xDD,0xC1,0xB2,0xE3,0xD4};
Connection
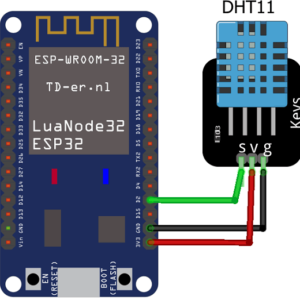
DHT11 signal pin is connected with D2 pin of ESP32, VCC to 3.3v of ESP32 and ground to GND pin respectively. The connection is simple and easy.
Suggested Reading:
- IoT Heart Rate Monitoring with ThingSpeak Platform
- Temperature Monitoring with ESP-DASH Webserver
- Wemos D1 Mini Web Server based Servo Motor Control
- ESP8266 Web Server for Controlling Electrical Devices
- DHT11 Data Logger using Raspberry Pi and Python code
- Controlling ESP32 via Bluetooth using Blynk
- Send DS18B20 Temperature Sensor data to ThingSpeak
- IoT based Timer Switch using Blynk and NodeMCU
- ESP32 based Switch Notification Project using Blynk
- Smart Switch using Blynk | IoT Based WiFi Switch
- PIR based Motion Switch | PIR Sensor Light
- IoT based water level Indicator using ESP8266
- Touch Based Switch board using TTP223
- IoT based Door Security Alarm Project with Blynk
Transmitter & Receiver Code
The transmitter code will be uploaded to ESP32 board. This board will transmit the data using ESP-NOW protocol. Receiver code will be uploaded in WeMOS D1 mini board. It will display the sensor data using Arduino IDE serial monitor. You can download both the codes from below link

For uploading the code in respective board please refer to below article
Construction and Testing
After connecting the sensor with ESP32, we have powered both the ESP board to send and receive sensor data.

Once the code is uploaded in ESP32, it will start sending the sensor data and get a acknowledgement, whether the data is delivered or not.
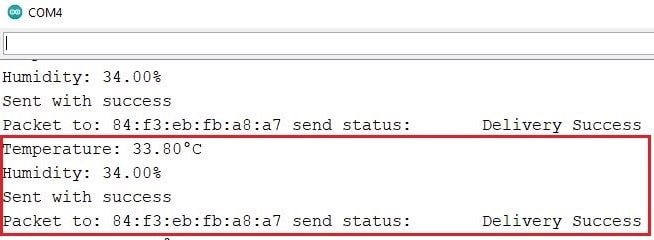
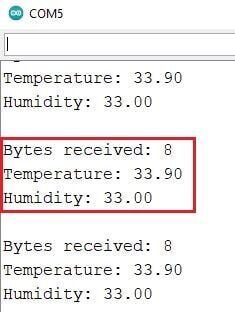
The receiver will capture and display the data in serial monitor as shown below. This indicates the ESP-NOW protocol has been successfully implemented and working fine.
Conclusion
In this tutorial you learnt how to send data from ESP32 or ESP8266 to another ESP board using ESP-NOW. ESP32 collects the data using DHT11 sensor board and broadcast the data using ESP-now protocol. This data is collected by WeMOS D1 mini and displayed in Arduino Serial monitor.
Hello friend how are you?, very good your tutorial I managed to do with a DHT22 was perfect. I’m new to the IOT area and I’m trying to irrigate a vegetable garden using a soil moisture sensor with an ESP32 and an ESP8266 with a solenoid valve via ESP-NOW because where I’m going to use there’s no internet so I chose ESP-NOW, but I’m with difficulty in creating this code would like to ask if possible for help, I’m waiting, thank you very much. Sorry my English I’m Brazilian and I’m using google translator.