ESP32 Cam code upload using Arduino Uno
Introduction
In this era of IoT, we are developing many security IoT projects which requires camera module. ESP32 camera module is a cost effective ESP32 chip based wifi camera module. In this article we will see ESP32 Cam code upload using Arduino Uno. There are many ways to upload code in ESP32 cam but this is one of the simple way we have come across.
So lets quick see how to do it!
What is ESP32 cam ?
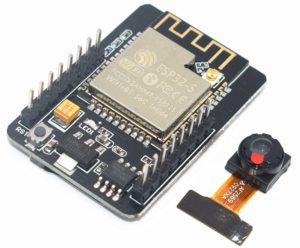
ESP32 CAM is a small camera module built using ESP32-S chip. This module is economical and it is equipped with OV2640 camera. This module also has several GPIOs (General Purpose Input Output) which helps in interfacing other peripherals. ESP32 cam also equipped with a microSD card slot which is useful to store images and videos.
ESP32 Cam Specifications :
- Small form factor with 802.11b/g/n SoC Module
- Supports Wi-Fi and BlueTooth
- Low power 32-bit CPU
- Up to 160MHz clock speed
- Built-in 520 KB SRAM, external 4MPSRAM
- Supports UART/SPI/I2C/PWM/ADC/DAC
- Support OV2640 and OV7670 cameras
- Built-in with Flash lamp
- Support WiFI upload for images
- Support micro SD card
- Supports multiple sleep modes
Parts List
Only 3 parts are needed which are listed below
- ESP32 Cam module x 1 BEST BUY
- Arduino Uno (Arduino Nano will also work) x 1 BEST BUY
- Jumper cables BEST BUY
- Arduino IDE software
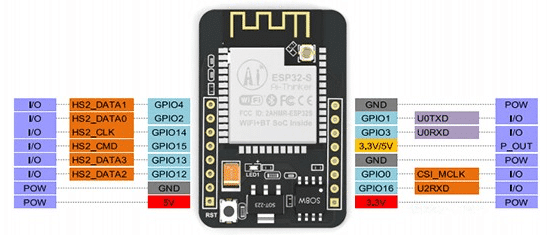
Pin-out Diagram
You can follow the pin diagram while connecting the ESP32 with Arduino Uno.
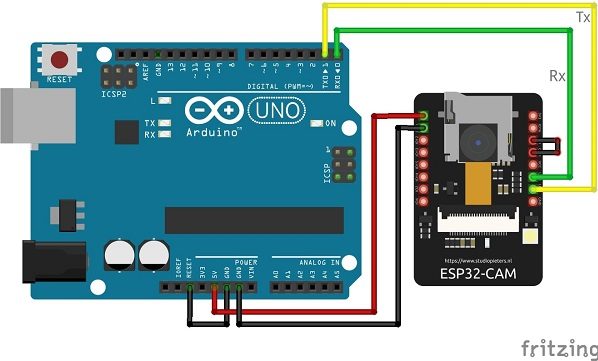
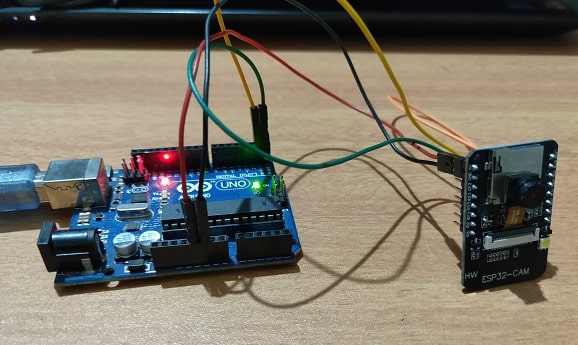
Connection Diagram
The connection diagram is simple. Follow the diagram below.
Before uploading the code connect GPIO0 to GND. Once the code is uploaded remove this jumper and press the RST button on ESP32 cam.
| Arduino Uno | ESP32 Cam |
| 5V | 5V |
| GND | GND |
| Tx | Tx |
| Rx | Rx |
Arduino IDE Setup
In order to upload the code in ESP32 cam we have to install ESP32 board first. If you are new, then you can check out the below link on how to upload code in ESP32.
ESP32 programming using Arduino IDE
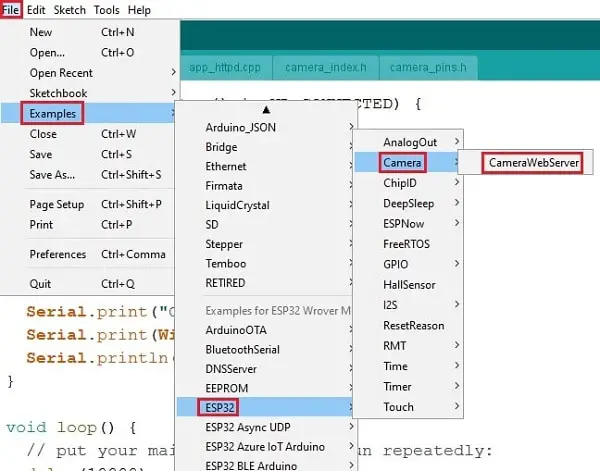
Here we will be using the default code with some changes.
Go to File -> Example -> ESP32 -> Camera -> CameraWebServer
Code
We are uploading the default sketch but we have added few lines of code to eliminate brownout detector was triggered esp32 error. This is a common error which occurs during the startup of the code and fails to run.
Just copy paste the below code.
#include "esp_camera.h"
#include <WiFi.h> ;
#include "soc/soc.h"
#include "soc/rtc_cntl_reg.h"
//
// WARNING!!! Make sure that you have either selected ESP32 Wrover Module,
// or another board which has PSRAM enabled
//

#define CAMERA_MODEL_AI_THINKER
#include "camera_pins.h"

const char* ssid = "YOUR_SSID";
const char* password = "YOUR_PASSWORD";

void startCameraServer();

void setup()
{
WRITE_PERI_REG(RTC_CNTL_BROWN_OUT_REG, 0
);
Serial.begin(115200);
Serial.setDebugOutput(true);
Serial.println();

camera_config_t config;
config.ledc_channel = LEDC_CHANNEL_0;
config.ledc_timer = LEDC_TIMER_0;
config.pin_d0 = Y2_GPIO_NUM;
config.pin_d1 = Y3_GPIO_NUM;
config.pin_d2 = Y4_GPIO_NUM;
config.pin_d3 = Y5_GPIO_NUM;
config.pin_d4 = Y6_GPIO_NUM;
config.pin_d5 = Y7_GPIO_NUM;
config.pin_d6 = Y8_GPIO_NUM;
config.pin_d7 = Y9_GPIO_NUM;
config.pin_xclk = XCLK_GPIO_NUM;
config.pin_pclk = PCLK_GPIO_NUM;
config.pin_vsync = VSYNC_GPIO_NUM;
config.pin_href = HREF_GPIO_NUM;
config.pin_sscb_sda = SIOD_GPIO_NUM;
config.pin_sscb_scl = SIOC_GPIO_NUM;
config.pin_pwdn = PWDN_GPIO_NUM;
config.pin_reset = RESET_GPIO_NUM;
config.xclk_freq_hz = 20000000;
config.pixel_format = PIXFORMAT_JPEG;
//init with high specs to pre-allocate larger buffers
if(psramFound()){
config.frame_size = FRAMESIZE_UXGA;
config.jpeg_quality = 10;
config.fb_count = 2;
} else {
config.frame_size = FRAMESIZE_SVGA;
config.jpeg_quality = 12;
config.fb_count = 1;
}

#if defined(CAMERA_MODEL_ESP_EYE)
pinMode(13, INPUT_PULLUP);
pinMode(14, INPUT_PULLUP);
#endif

// camera init
esp_err_t err = esp_camera_init(&config);
if (err != ESP_OK) {
Serial.printf("Camera init failed with error 0x%x", err);
return;
}

sensor_t * s = esp_camera_sensor_get();
//initial sensors are flipped vertically and colors are a bit saturated
if (s->id.PID == OV3660_PID) {
s->set_vflip(s, 1);//flip it back
s->set_brightness(s, 1);//up the blightness just a bit
s->set_saturation(s, -2);//lower the saturation
}
//drop down frame size for higher initial frame rate
s->set_framesize(s, FRAMESIZE_QVGA);

#if defined(CAMERA_MODEL_M5STACK_WIDE)
s->set_vflip(s, 1);
s->set_hmirror(s, 1);
#endif

WiFi.begin(ssid, password);

while (WiFi.status() != WL_CONNECTED) {
delay(500);
Serial.print(".");
}
Serial.println("");
Serial.println("WiFi connected");

startCameraServer();

Serial.print("Camera Ready! Use 'http://");
Serial.print(WiFi.localIP());
Serial.println("' to connect");
}
void loop()
{
// put your main code here, to run repeatedly:
delay(10000);
}
Uploading the code using Arduino IDE
Before uploading the code, go to Tools and make below configurations
- Select Board : “ESP32 Wrover Module”
- Flash Mode : QIO
- Flash Frequency : 40MHZ
- Partition Scheme : Huge App (3mb No OTA/1MB SPIFFS)
- Upload speed : 115200
- Programmer : AVR ISP
You can connect the ESP32 cam with Arduino as per the given diagram. make sure you have connected GPIO0 with GND and click on upload button. Once uploading is finished remove the jumper from GPIO0.
Testing
After connecting and uploading the code you ESP32 cam is ready to test. The above code will start the esp32 camera server and you can start streaming videos and take photos.
Open the serial monitor and reset the ESP32. You can see the IP address on which the cam web server has started.
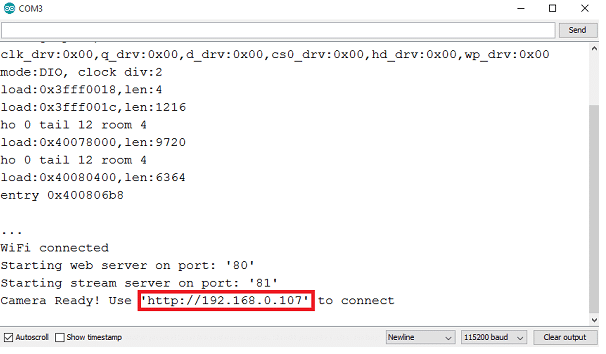
Enter the same IP Address in your browser and press enter
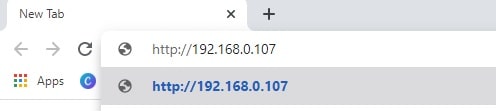
The web server page will now open with some settings
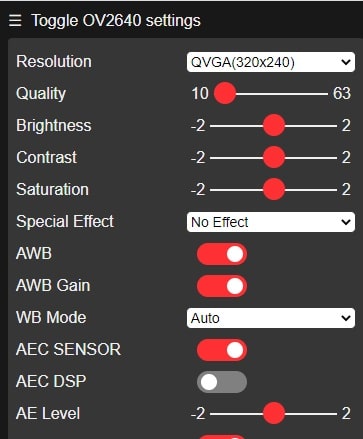
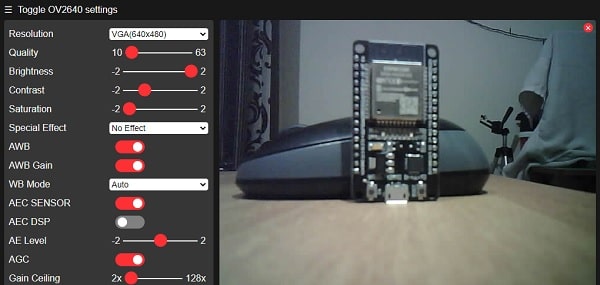
Scroll down and click on Start Stream
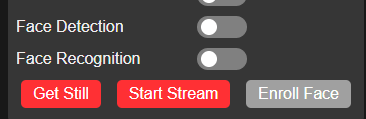
The ESP32 cam will start streaming video.
Full Video Tutorial
Conclusion
This is a low cost camera module which can be used in IoT projects. ESP32 Cam code upload using Arduino Uno is simple way to upload the code in ESP32 cam. You can also use FTDI 232 serial to USB converter.
buenas tardes por que cuando selecciono la placa 32 se desactivan el programador y ya no puedo subir el programa
por favor verifique en arduino IDE, que todas las bibliotecas requeridas estén presentes.
where are remaining files of cpp and .h files
Hello… I have trouble getting the IP Address. When I open the serial monitor and reset the ESP32, I can’t see the IP address. What I got is infinite dots. Please Help.
How to select the programmer avr isp
I am getting no programmer available for this board