Raspberry Pi Pico with LCD & SSD1306 OLED Display
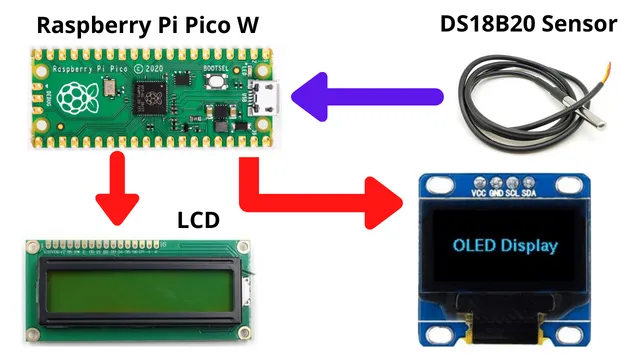
Displays are most important part of a electronics project. For an IoT based project or an non IoT based projects, displays are required. In this tutorial we will learn about connecting a Raspberry Pi Pico with LCD & SSD1306 OLED display. You can use either of the display in your project using raspberry pi pico or pico W.
This entire project is coded using MicroPython. It can be helpful for those who are planning to start with MicroPython. We are using a temperature sensor to measure the temperature and display the data in degree Celsius as well as degree Fahrenheit.
Components Required
- Raspberry Pi PICO
- DS18B20 Temperature Sensor
- OLDE Display SSD1306 SPI
- I2C 16X2 LCD Display or I2C LCD converter
- Jumper Cables
I2C LCD Display module
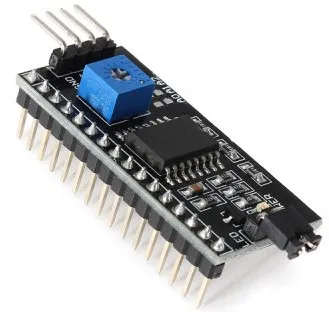
LCD Display module is used to display text, graphics or images. I2C LCD Display module operates in the I2C bus protocol and has a standard 8-bit data bus. The module has an 8bit data bus and can support up to 256 characters. It is a single-chip solution and can be interfaced with a microcontroller using the I2C bus. I2C LCD Display module has a simple data transfer protocol and available in a 8×8 or 16×16 pixel format.
Working
The sensor DS18B20 measures the temperature and sends the data to Raspberry Pi Pico. Further it shows the data in LCD and in 128×64 oled display.
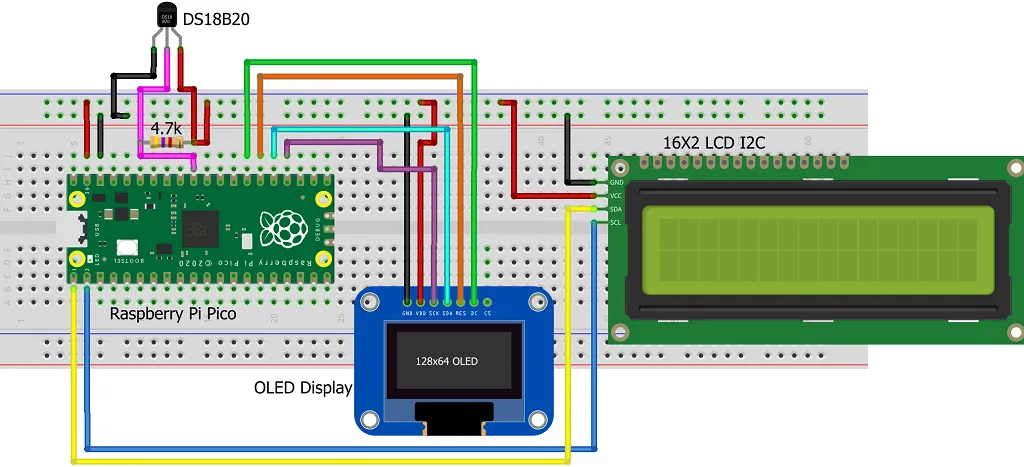
Connection
There are 2 displays connected with Pi Pico along with the sensor. The pin details are given in the table format and the connection diagram is shown below. For I2C LCD, the SDA and SCL pin is connected to Pin 1 and Pin 2 of Raspberry Pi PCIO respectively.
Raspberry Pi Pico | OLED |
Pin 36 3.3v | Vcc |
Pin 8 GND | GND |
Pin 24 | SLC |
Pin 25 | SDA |
Pin 26 | RES |
Pin 27 | DC |
Code
The python code contains libraries and the actual code. You can download the code from the given link and open it using Thonny python editor. Unzip the file and upload it in your raspberry pi pico. Do not rename any python file present in the folder with out knowing the code properly.

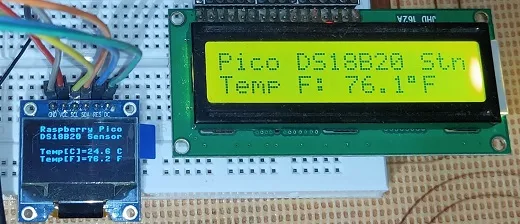
Building & Testing
We have connected the components on a breadboard as per the connection diagram. Now we have uploaded the code and powered the entire project.
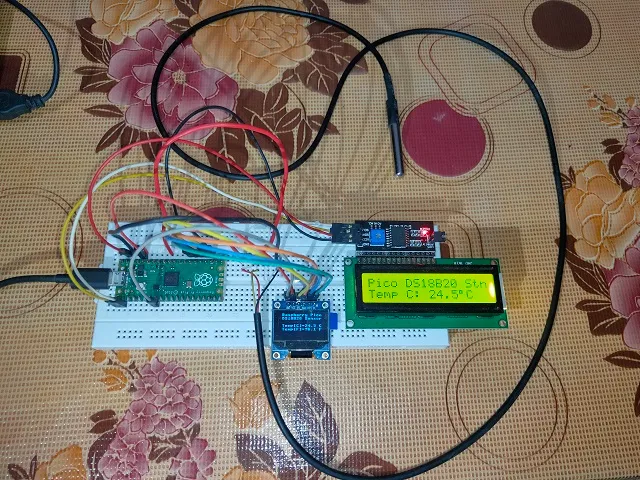
The DS18B20 temperature sensor will start measuring the temperature and display it in OLED display as well as LCD display as shown below. After every 3 seconds the temperature data will change and get updated in LCD and oled displays.
Summary
In this tutorial we have learnt to interface DS18B20 temperature sensor with raspberry pi pico along with oled and LCD display together. The entire library and code is in micro python language. If you like this project, then share it will your friends and other’s who are looking for micro python projects.
Other Projects:
- Raspberry Pi Pico W web server with BMP180 sensor
- Controlling Devices with Raspberry Pi using Python
- IoT LPG Gas Detection with Blynk 2.0
- Building Node-RED Dashboard with DHT11 Sensor
- IoT Smart Plant Watering System Project
- Monitoring Weather Data using BMP280 and Blynk 2.0
- Getting Started with Arduino IoT cloud using NodeMCU and DHT11
- Weather Station with Raspberry Pi PICO and DHT11
- Controlling a servo motor using Raspberry Pi Pico
- Configuring BMP280 Sensor with Raspberry Pi
- Weather Station with BMP280 Sensor and Raspberry Pi Pico