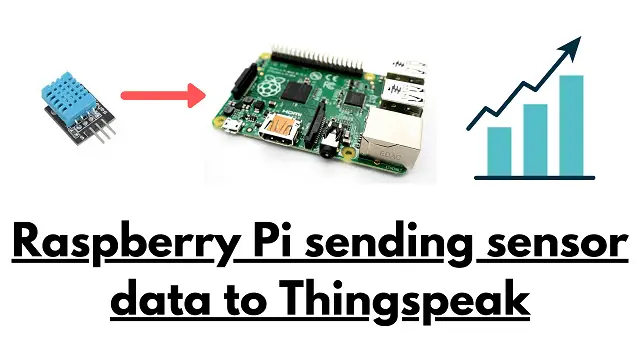
How to send sensor data to Thingspeak using Raspberry pi
In some IoT projects data is generated continuously. One way to permanently store them is by saving the data in a local database, however there are other alternatives also available. One of these alternatives is ThingSpeak. Here you can create a free account for small applications and transfer your data very easily. And that’s exactly what this tutorial is about on How to send sensor data to Thingspeak using Raspberry Pi.
Things Needed
For building this project you need below components.
- Raspberry Pi
- DHT11 Sensor
- Jumper Cables
How it works?
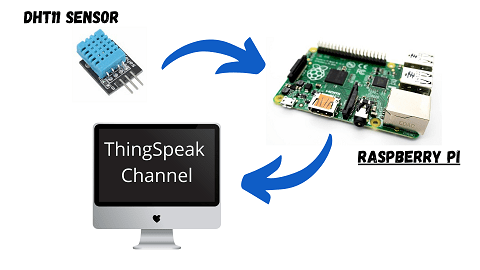
The working of this project is simple and easy. DHT11 sensor will collect the temperature and humidity data and send it to Raspberry Pi. Later Raspberry Pi will send it to Thingspeak channel.
Setting Up Thingspeak Account
Before starting, you need a ThingSpeak account. Create an account by clicking on this link here. After creating the account login and click on New Channel to create a channel.

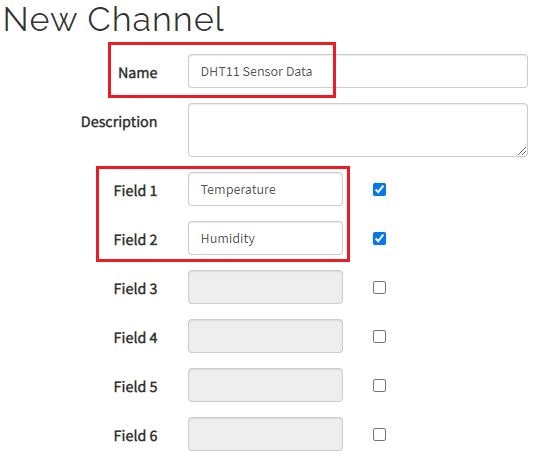
We will define the channels by entering the a proper name, description, and up to 8 fields can be used to name the parameter. For the Field 1 and Field 2 we have named Temperature and humidity. These field values that you set can be modified later. These values will be in Degree Centigrade and Relative Humidity in %. Once you update the name, click on Save.
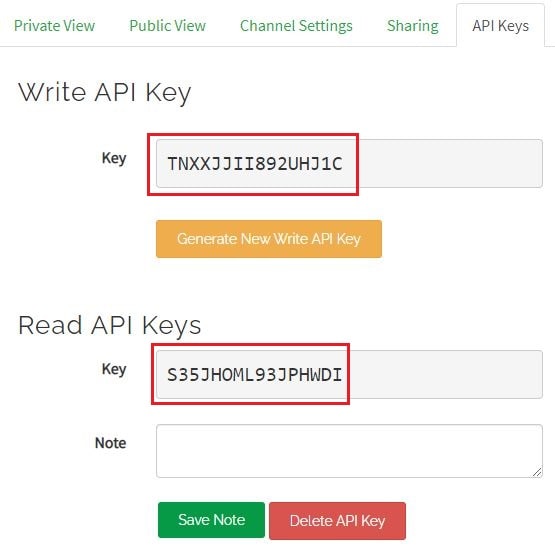
Once you have saved the channel, you will be automatically redirected to the “Private View” tab. Here the mapped fields are shown as a diagram. You will find the “Channel ID” (we will need it later). Below You will also see API Keys option.
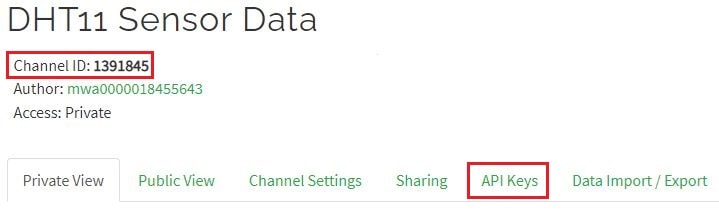
Later, click on the “API Keys” tab. The two values of “Write API key” and “Read API key” are equally necessary for us to write or retrieve data. Copy these keys and keep it safe as we need to put it in the code.
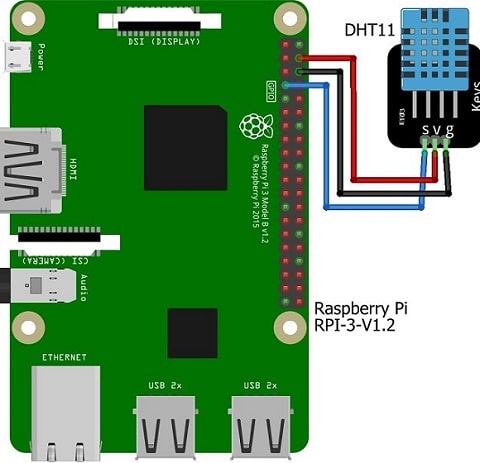
Connection Diagram
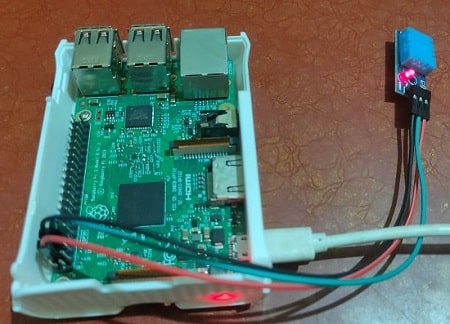
This is how you have to make the connection with the sensor to the Pi board. Data or signal pin of DHT11 sensor is connected with GPIO 4 with Raspberry Pi.
Installing Required Libraries
Before installing the libraries we need to update the packages installed in Raspberry Pi. For installing the basic updates run these commands in a terminal window on your Raspberry Pi
sudo apt - get update
sudo apt - get install build - essential python - dev python - openssl git
Now we install the library to read the DHT11 or DHT22 sensors. Below library will work for both the sensor types.
git clone https://github.com/adafruit/Adafruit_Python_DHT.git && cd Adafruit_Python_DHT
We have to run the below command to install Python
sudo python setup.py install
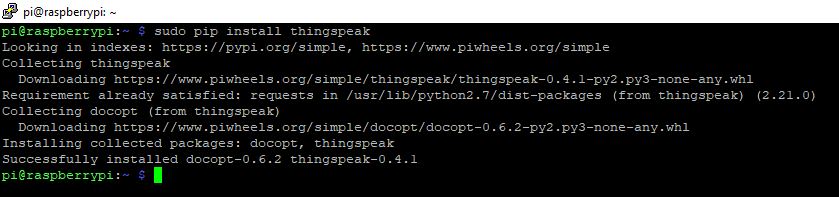
Installing Raspberry Pi Thingspeak Library
In order to use the service, it is possible to simply send the data via “POST” or retrieve it via “GET”. The functions are available in almost any programming language. If you don’t have enough experience or just don’t feel like writing it, you can also use the ThingSpeak library. For this we simply install it using below command
sudo pip install thingspeak
sudo nano thingspeak_DHT11.py
Inside this new file we will copy this python code
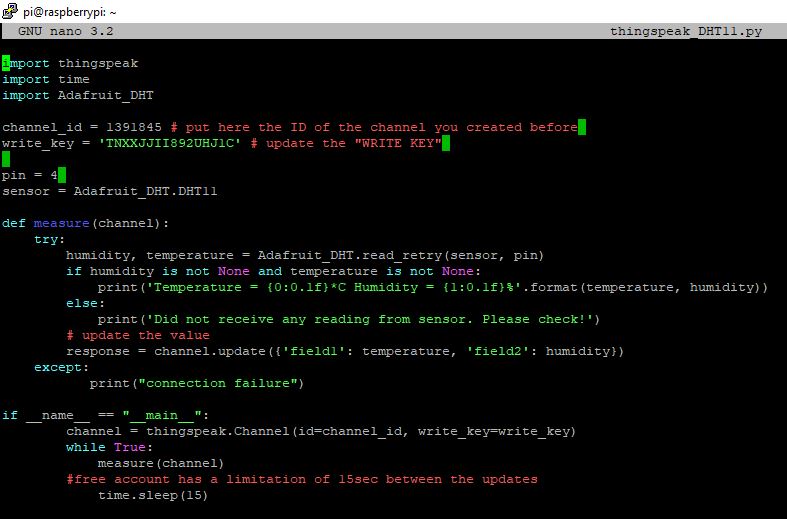
Now Update the code with Channel ID and write key values from Thingspeak portal. Now save it and your code is ready to run.
channel_id = 1391845 # put here the ID of the channel you created before
write_key = 'TNXXJJII892UHJ1C' # update the "WRITE KEY"
Code
If you are using a different GPIO for the sensor apart from GPIO4 then you have to make changes in pin variable in the code. For DHT22 sensor, the code needs to be adjusted a bit more.
You can download the code from the below link and extract it in the root of Raspberry pi directory (/home/pi).
 Building and Testing
We have connected the DHT11 sensor with Raspberry Pi as per the connection diagram above. It is also ready with the code to be executed.
For executing the code run the below command in your raspberry pi terminal.
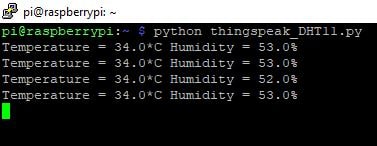
python thingspeak_DHT11.py
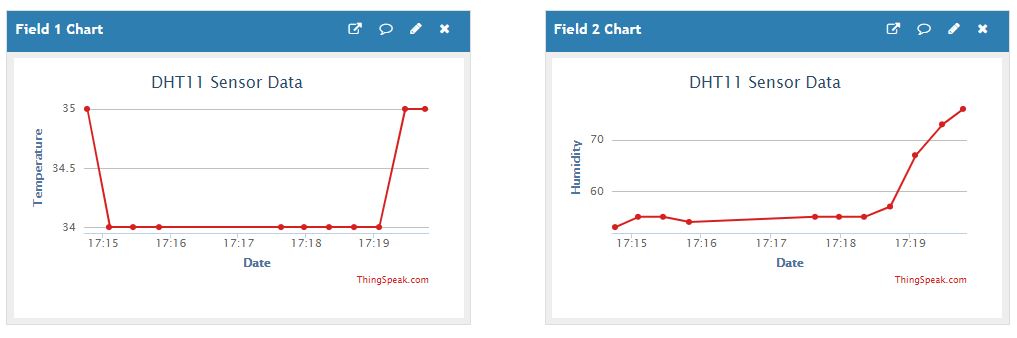
Now you will see the output in raspberry pi terminal as well as in Thingspeak dashboard.
In Thingspeak dashboard you can see the graph and the readings.
More Interesting Projects:
- Raspberry Pi Pico vs Arduino Which one to choose?
- Raspberry Pi Flask Web Server with DHT11
- IoT Heart Rate Monitoring with ThingSpeak Platform
- Raspberry Pi Temperature Logger DS18B20
- Important Tips to Improve Security of your Raspberry Pi
- Raspberry Pi PICO with Thonny IDE
- Send DS18B20 Temperature Sensor data to ThingSpeak
- ESP32 based Gas Leakage Detection using Email Notification
- IoT based Motion Detection Alarm using ESP8266 and Blynk
- IoT based Fire Security Alarm System using NodeMCU
- NodeMCU based WiFi Network Scanner with OLED Display
- IoT based Fire Security Alarm System using NodeMCU
- ESP32 Web Server PWM based LED Control
- IoT Vehicle Parking System using ESP8266 and Blynk
DIY Exercise
If you want to build a weather station then you can use the below sensors. You can use the same code but you need to tweak it as per the sensors below. You can do it as a DIY exercise
- DHT22
- BMP180
- LDR
Summary
In this project we are using a DHT11 temperature and humidity sensor with Raspberry Pi. The raspberry pi will connect the values and send it to Thingspeak platform to a particular channel to display the data. We are using python code to run this project. You can enhance this project by adding some more sensors and send the same data to Thingspeak. Hope you like this project and don’t forget to share this article.
Hi,
these are fundamental exercises always useful for those approaching the IoT.
We also offer the same didactic approach on our beeno iot platform. In our case, however, we are talking about node.js and mqtt protocol. all references can be found here https://beeno.it/docs/how-to-guides/connect-an-rpi-to-beeno
I hope you like to share our article.
thank you.
best regards from Italy.
Hello
which version of thingspeak is this using because i get this error.
thingspeak has no attribute “channel”.
I’m struggling to
Hi,
Hope you have created the channel before you proceed.
Thingspeak is an online tool which will display the data sent form you hardware.
Go through the tutorial again, don’t miss any step and it should work.
Hi, I am having trouble installing openssl, and get the error “Unable to locate pakage python-openssl” during the 2nd step of the Installing Necessary Libraries” section of the tutorial. I am using a Raspberry Pi 400, with the currently latest version of Raspberry Pi OS, and had no issues running the previous command, “sudo apt-get update”
I’ve been trying a handful of different IoT projects and was hoping this would be the one I could get working, but am unable to get this tutorial to working either.
Thanks for the detailed tutorial!
Hello, and thank you for a tremendous article, this was very helpful.
Just a little note – at the time of writing this, there is a little typo in the example code (which caused me some grey hairs). On the line 24, the example code is “write_key=write_key”, when it should be “api_key=write_key”.
Thanks!
Hello I am error connection failure?