Interfacing LM35 Temp Sensor with Arduino
There are many temperature sensors available in the market. In this article we will learn about interfacing LM35 temp sensor with Arduino. Using this sensor you can monitor temperature of any object or room. This a simple tutorial to understand the interfacing between LM35 and Arduino Uno and also connecting a 16×2 LCD display.
Parts List
- Arduino Uno x 1 (Best BUY)
- LM35 Temperature Sensor x 1 (Best BUY)
- 16×2 LCD Display x 1 (Best BUY)
- Breadboard (Best Buy)
- Jumper cables (Best Buy)
Sensor Details
LM35 Temperature Sensor
LM35 is an analog temperature sensor which means the output is an analog signal. Micro-controllers don’t accept analog signals in their input pins directly.
Therefore we need to convert this analog output signal to digital. For converting this signal we need ADC( Analog to Digital Converter). Once we convert the signal to digital, our micro controller can accept it.
Pin Configuration:
|
Pin Number |
Pin Name |
Description |
|
1 |
Vcc |
Input voltage is +5V for typical applications |
|
2 |
Analog Out |
There will be increase in 10mV for raise of every 1°C. Can range from -1V(-55°C) to 6V(150°C) |
|
3 |
Ground |
Connected to ground of circuit |
LM35 Regulator Features:
- Minimum and Maximum Input Voltage is 4V and 20V
- Temperature measure ranging from -55°C to 150°C
- Output voltage is directly proportional (Linear) to temperature (i.e.) there will be a rise of 10mV (0.01V) for every 1°C rise in temperature.
- Accuracy ±0.5°C
- Economical temperature sensor
- Compact is size hence suitable for remote applications
- Available in various package TO-92, TO-220, TO-CAN
LM35 Temperature Sensor Applications:
- Measuring temperature of a particular environment
- Providing thermal shutdown for a circuit or component
- Monitoring Temperature of Battery
- Measuring Temperatures of High Voltage AC devices
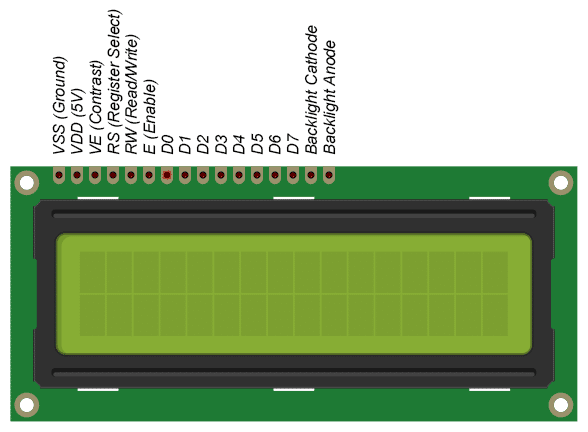
16×2 Liquid Crystal Display:
This LCD display has 16 pins and the pin out are shown below. This display has 2 line to display data and it can show 16 characters on each line.
Recommended Reading:
- DS18B20 with NodeMCU Local WebServer
- Smart Switch using Blynk | IoT Based WiFi Switch
- Telegram NodeMCU based Home Automation
- IoT based Door Security Alarm Project with Blynk
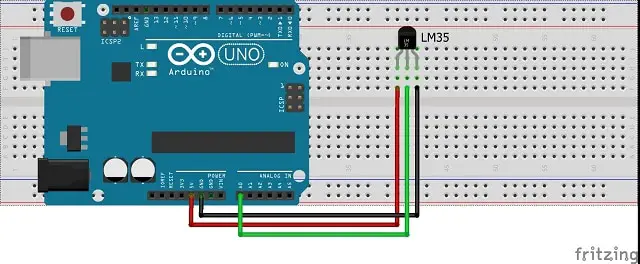
Circuit Diagram without LCD
The circuit diagram is simple and easy. You can connect it without breadboard. Further in this article we will add a 16×2 LCD display to this project.
Code without LCD
This is a very simple code to test and get the temperature readings from LM35 and display it in serial console. It is easy to connect arduino uno and interfacing with temperature sensor. LM35 is interfaced with Analog pins. The LM35 temperature sensor is connected with Arduino and simple formula is used.
You can copy paste this below code in Arduino IDE.
int sensor_data = A0;
float temp;
float temp_value;
float tempC;
float tempF;

void setup()
{
Serial.begin(9600);
pinMode(sensor_data, INPUT); //initialize A0 pin as input
}

void loop()
{
temp= analogRead(sensor_data); // Store the LM35 sensor data in temp variable
temp_value = (temp * 4.88); //convert the analog sensor data value to digital
tempC =(temp_value/10); //LM35 gives output of 10mv/°C
tempF = ((tempC *(9/5))+32); //Converting degree centigrade to fahrenheit
Serial.print ("Temperature in Degree Celsius = ");
Serial.println (tempC);
Serial.print ("Temperature in Degree Fahrenheit = ");
Serial.println (tempF);
Serial.println("**************************************");
delay(1000);
}
Setup
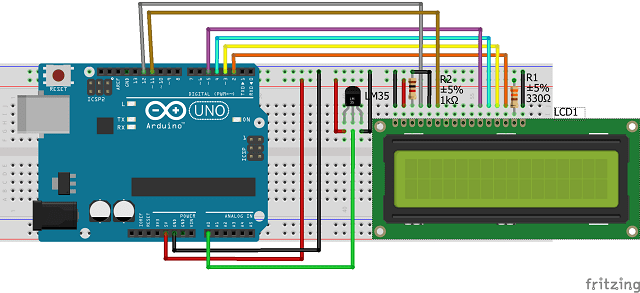
You can connect it using breadboard as shown in the diagram. The LCD will be showing the temperature in degree Celsius and Fahrenheit.
Adding 16×2 LCD
Now we will connect a 16×2 LCD display with above project to display the temperature values in LCD display. This display has 2 lines and each line can display 16 characters. This display is used in many real time projects.
Circuit Diagram with LCD
Code with LCD
In this code we have added LCD library and used some statements to display the sensor values in it. You can easily compare the changes.
#include <LiquidCrystal.h>
int sensor_data = A0;
float temp;
float temp_value;
float tempC;
float tempF;

const int rs = 12, en = 11, d4 = 5, d5 = 4, d6 = 3, d7 = 2;
LiquidCrystal lcd(rs, en, d4, d5, d6, d7);

void setup()
{
Serial.begin(9600);
pinMode(sensor_data, INPUT); //initialize A0 pin as input
// set up the LCD's number of columns and rows:
lcd.begin(16, 2);

}

void loop()
{
temp= analogRead(sensor_data); // Store the LM35 sensor data in temp variable
temp_value = (temp * 4.88); //convert the analog sensor data value to digital
tempC =(temp_value/10); //LM35 gives output of 10mv/°C
tempF = ((tempC *1.8)+32); //Converting degree centigrade to fahrenheit
Serial.print ("Temperature in Degree Celsius = ");
Serial.println (tempC);
Serial.print ("Temperature in Degree Fahrenheit = ");
Serial.println (tempF);
Serial.println("**************************************");

lcd.setCursor(0, 0);
lcd.print("TEMP in C: ");
lcd.print(tempC);
lcd.setCursor(0, 1);
lcd.print("TEMP in F: ");
lcd.print(tempF);
delay(1000);
}
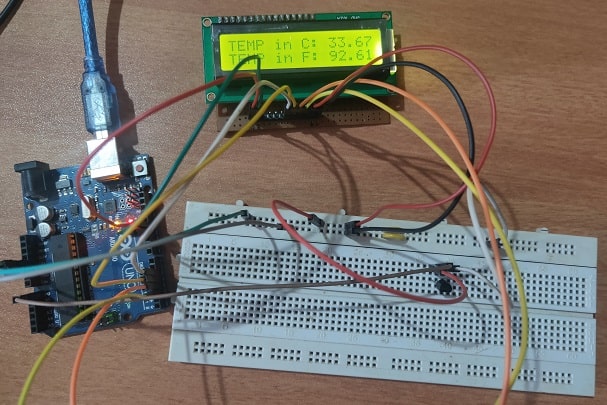
Testing
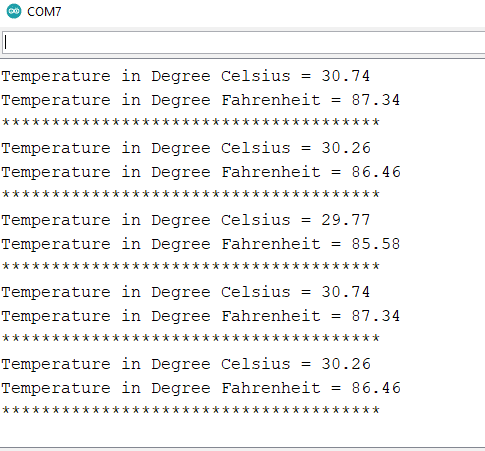
Once the code is uploaded in Arduino, Open the Serial monitor and you will be able to see the output as shown below. Also if you upload the code with LCD, you will be able to see the sensor readings in LCD display.
Conclusion
This is a simple project to build and understand the interfacing concepts between LCD, Arduino and LM35 temperature sensor. You can modify the code as per your project or needs. If you make any interesting project using this, then please comment and let us know.