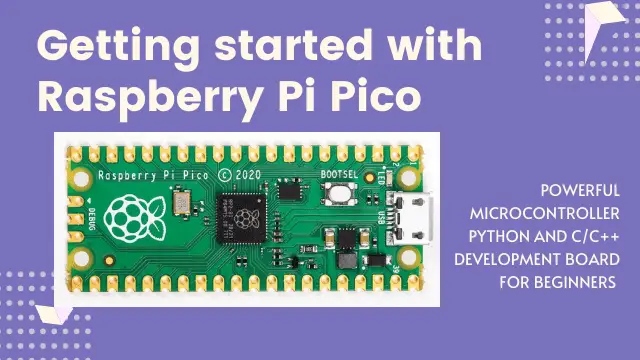
Pico Cheapest MicroPython Board
The Raspberry Pi Foundation changed single-board computing when they came up with the Raspberry Pi PC. Now they’re prepared to do same with microcontrollers with the arrival of the brand new Raspberry Pi Pico. This ease microcontroller board includes an incredible new chip, the RP2040. It is also equipped with all the electronics to begin with electronics projects at a low cost. Pico Cheapest MicroPython Board available till now.
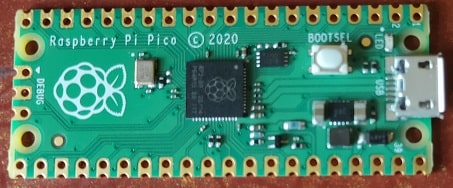
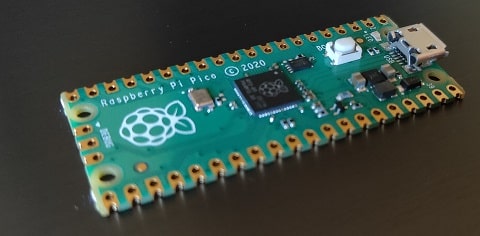
The Pico is 0.825″ x 2″ and can have headers soldered in it. It can be used in a breadboard or can be connected straight away onto a PCB as well. There’s 20 pins on each side of the board. It also has lots of GPIO pins along with a lot of ground pins. In this tutorial with will learn to Get Started with MicroPython on Raspberry Pi Pico.
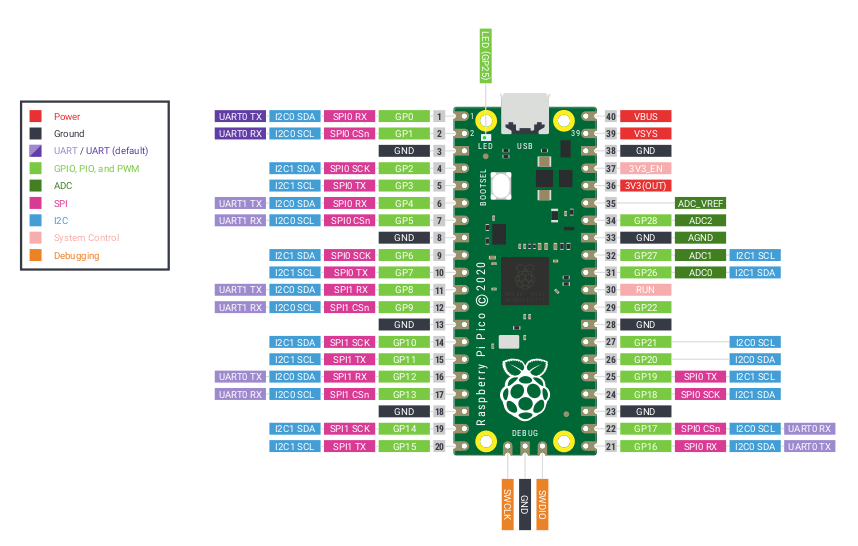
The GPIO pins are 3.3V tolerant and are not 5V sustainable. You get a sum of 25 GPIO pins (actually there are 26 however GPIO 15 has a particular reason and ought not be utilized by projects). 3 pins serve as analog input and unfortunately it doesn’t have any real analog output pin.
On the thin green board has small amount of hardware to generate you a 5V to 3.3V supply converter. It also has a green LED on GP25, a boot select switch. The RP2040 chip is equipped with a dual-core Cortex M0 processor with 2 Mega Bytes of Quad Serial Peripheral Interface flash storage.
The RP2040 has a ‘permanent ROM’ USB UF2 bootloader. What that implies is the point at which you need to program new firmware, you can hold down the BOOTSEL button while connecting it to USB and it will show up as a USB drive. The alternate way to do this is pulling down the RUN/Reset pin to ground. Now you can drag the firmware onto this usb drive to upload it.
People who have been utilizing Adafruit items will locate this recognizable – we utilize the method all our local USB development boards. Simply note you don’t double press reset button, rather hold down BOOTSEL during boot to enter the bootloader!
The RP2040 is an amazing chip, which has the clock speed of our M4 (SAMD51). This chip with two cores is same as M0 (SAMD21). For connecting other devices, there are two I2C controllers present. It also has two SPI and two UARTs that are multiplexed across the GPIO. Refer the pinout for what pins can be set to which. There are 16 PWM channels, each pin has a channel it very well may be set to (likewise on the pinout).
While the RP2040 has lots of onboard RAM (264KB), it does not have built in FLASH memory. Instead that is provided by the external QSPI flash chip. On this board there is 2MB, which is shared between the program its running and any file storage used by MicroPython. When using C/C++ you get the whole flash memory, if using Python you will have about 1 MB remaining for code, files, images, fonts, etc.
Technical Specifications
You can download the raspberry Pi datasheet from the link below.
RP2040 Chip features
- Dual ARM Cortex-M0+ @ 133MHz
- 264kB on-chip SRAM in six independent banks
- Support for up to 16MB of off-chip Flash memory via dedicated QSPI bus
- DMA controller
- Fully-connected AHB crossbar
- Interpolator and integer divider peripherals
- On-chip programmable LDO to generate core voltage
- 2 on-chip PLLs to generate USB and core clocks
- 30 GPIO pins, 4 of which can be used as analog inputs
- 2 UARTs
- 2 SPI controllers
- 2 I2C controllers
- 16 PWM channels
- USB 1.1 controller and PHY with host and device support
- 8 PIO state machines
Pin Out of PICO
The one disadvantage of the Raspberry Pi Pico is that there is no Wi-Fi availability. The RP2040 is the first microcontroller in the Pi reach and this carries with it another method of working. The Pico isn’t a PC, rather we need to compose code in an external application on an PC and upload the code to the microcontroller over USB. In our tutorial on the best way to begin with Raspberry Pi Pico, we explained how to interface a PC to the Pico and use it to flash MicroPython code.
Working at 3.3V, the Raspberry Pi Pico has a 40 pin GPIO, however it doesn’t have a similar structure as the Raspberry Pi’s before it. We have GPIO pins for Digital I/O, PWM and for advance interconnection I2C, SPI, UART/Serial. The GPIO additionally has three Analog input pins. This is something other Raspberry Pi don’t have. These pins are utilized by variable voltages to interface with, for instance, a potentiometers, joystick or LDR.
Other Projects:
- Raspberry Pi Temperature Logger DS18B20
- DHT11 Data Logger using Raspberry Pi and Python code
- Controlling ESP32 via Bluetooth using Blynk
- Raspberry Pi PICO with Thonny IDE
- Raspberry Pi PICO with Thonny IDE
- How to install Raspbian Lite on Raspberry Pi Zero W
Coding Languages
Raspberry Pi Pico can be programmed using 2 coding languages. They are very common and used very widely.
- C/C++
- Python
C/C++
In raspberry Pi Pico, writing code in C/C++ is made possible via two methods. First method is by writing the code directly in a text editor of our choice. Then build the files which are later flashed to the Pico. Second method, we can use a graphical workflow and use Microsoft’s Visual Studio Code handle the creation, build and upload. Arduino have reported that they will add support for the RP2040 to their Arduino IDE, which will improve on the C/C++ work process enormously.
Composing code for the Raspberry Pi Pico is taken care of in C/C++ or MicroPython, this is highly used and simple coding language for general and schooling use. There are many boards available but Pico Cheapest MicroPython Board.
Python
The quickest way to get started with embedded software on Raspberry Pi Pico is Python coding language. MicroPython is a Python version 3, which is meant for microcontrollers and small embedded projects.
Since MicroPython is profoundly effective and RP2040 is designed to work with small amount memory and processing power at a very low cost. MicroPython is a genuine device for embedded technology using Python.
Simple steps to get started with Raspberry Pi PICO using Python
Application
We can utilize Pico as a core of robotics and motor based projects. It can gather information utilizing sensors for temperature, humidity, light and smoke etc. We can also become familiar with the fundamentals of programming and gadgets.
Conclusion
The Raspberry Pi Pico was is a economical and powerful MicroPython supported development board. This can be used on multiple platforms and it is great for beginner’s projects. This is a basics informative tutorial about Raspberry Pi Pico. Beginners can try this and start with interfacing different sensors and devices with it.