Raspberry Pi Flask Web Server with DHT11
In this tutorial, we are going to learn about setting up a Raspberry Pi Flask Web Server with DHT11. In this project we are going to use Flask web framework to build a web server inside Raspberry Pi. Flask is a python based web framework. This is used to create and give professional look to web pages. In this web page the data will be shown. There will be 2 GPIO switch will be available thought which we will control the GPIO pins of Raspberry Pi. Flask has a lot of ability to build goo web apps but in this tutorial we will be using it to build a webpage.
Things You Need
- Raspberry Pi [BEST BUY]
- DHT11 Sensor [BEST BUY]
- LED’s x 2
- Resistor 330Ω x 2 (Optional)
- Jumper cables [BEST BUY]
- Breadboard [Best Buy]
Installing Flask
To create a webserver using flask we have to install it in Raspberry Pi. We have to run below command to install pip. pip is used to install different packages for Python.
sudo apt-get install python-pip
Now we will use pip to install flask in our raspberry pi by running the below command
sudo pip install flask
Once the above code is run successfully which means Flask is installed. Now let’s run a test program and check the flask based web server.
Testing Flask
Create a file named “flask_test.py” and copy the below code and paste it in the file then save.
# Importing the flask module
from flask import Flask

# Create a flask object named app
app = Flask(__name__)

# Once you enter the IP address of Raspberry Pi in the browser, below code will run.
@app.route("/")
def main():
	return "Hello, Welcome to IoT Starters"

#if code is run from terminal
if __name__ == "__main__":
	# Server will listen to port 80 and will report any errors.
   app.run(host='0.0.0.0', port=80, debug=True)
Open the terminal window on Raspberry Pi and run the file named “flask_test.py” by running the below command
sudo python flask_test.py
Once you execute the above command you should see the lines written in the terminal.
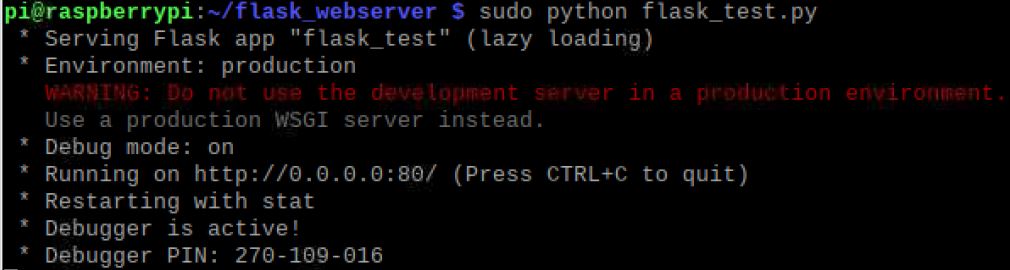
If you get the above lines as shown, now its time to check in browser. Find out the IP address of your Raspberry Pi. Put this IP address in your computer browser. If you are not sure how to find out the IP address of your Raspberry Pi, then you can use the command “ifconfig” on your raspberry pi terminal. It will show you the IP address of your Raspberry Pi. You can use the IP address in any of your device to access the web server. Just make sure all your devices are connected to same network.
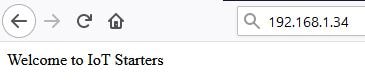
If you see the above message in the browser then your flask installation is done and web server is ready. Now we will create a proper web page which will show us the sensor data and also we will be able to control the GPIO pins using this web server dashboard.
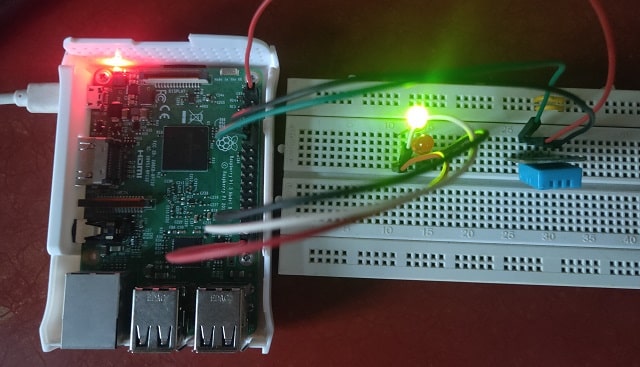
Connection
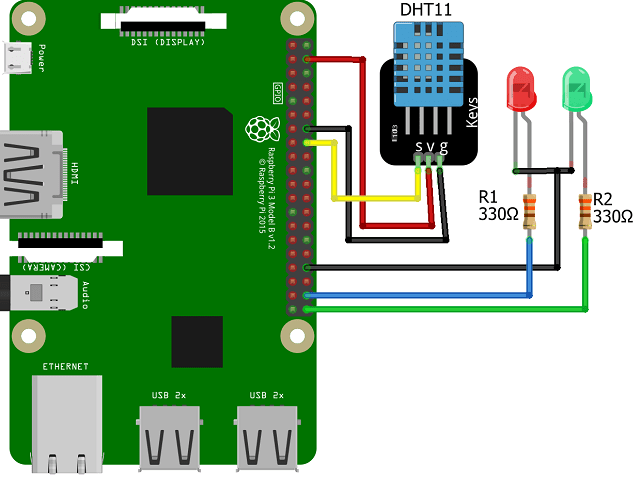
You have to connect the DHT11 sensor and LED’s with Raspberry Pi as shown below.
Coding and Configurations
There are two parts of code in this tutorial.
- Python code
- HTML Code
In the backend we will use python code to collect data from sensor and control GPIO of the Raspberry Pi. HTML code will be used as a front end or can be named as users interface thorough which user will control the GPIO and get the temperature data shown in a nice looking dashboard.
You can download the code from the below link as a zip file. You need to unzip it and you execute them.

Configuration
Download the zip file from the below download link. Create a folder named “flask_webserver” or any name you prefer in /home/pi. Inside this folder create a file named “RPI_webserver.py”. Now create another folder inside “flask_webserver” folder and name it as “templates”. Unzip the downloaded file and copy the file main.html file inside templates folder.
You can either copy the below code from below or copy paste the same from downloaded zip file.
PYTHON CODE
from flask import Flask, render_template
import RPi.GPIO as GPIO
import Adafruit_DHT as dht

app = Flask(__name__)

GPIO.setmode(GPIO.BCM)
led1 = 21
led2 = 20
DHT11_pin = 23

# Set each pin as an output and make it low:
GPIO.setup(led1, GPIO.OUT)
GPIO.setup(led2, GPIO.OUT)

@app.route("/")

def main():
   return render_template('main.html')

# The function below is executed when someone requests a URL with the pin number and action in it:
@app.route("/<pin>/<action>")
def action(pin, action):
   temperature = ''
   humidity = ''
   if pin == "pin1" and action == "on":
      GPIO.output(led1, GPIO.HIGH)

   if pin == "pin1" and action == "off":
      GPIO.output(led1, GPIO.LOW)

   if pin == "pin2" and action == "on":
      GPIO.output(led2, GPIO.HIGH)

   if pin == "pin2" and action == "off":
      GPIO.output(led2, GPIO.LOW)

   if pin == "dhtpin" and action == "get":
      humi, temp = dht.read_retry(dht.DHT11, DHT11_pin)  # Reading humidity and temperature
      humi = '{0:0.1f}' .format(humi)
      temp = '{0:0.1f}' .format(temp)
      temperature = 'Temperature: ' + temp
      humidity =  'Humidity: ' + humi

   templateData = {
   'temperature' : temperature,
   'humidity' : humidity
   }

   return render_template('main.html', **templateData)

if __name__ == "__main__":
   app.run(host='0.0.0.0', port=80, debug=True)
HTML CODE
Copy and paste the below code in “main.html” file or you.
<!DOCTYPE html PUBLIC "-//W3C//DTD XHTML 1.0 Strict//EN" "http://www.w3.org/TR/xhtml1/DTD/xhtml1-strict.dtd">
<head>
<title>Raspberry Pi Webserver</title>
<link href="https://cdn.jsdelivr.net/npm/bootstrap@5.0.0-beta3/dist/css/bootstrap.min.css" rel="stylesheet" integrity="sha384-eOJMYsd53ii+scO/bJGFsiCZc+5NDVN2yr8+0RDqr0Ql0h+rP48ckxlpbzKgwra6" crossorigin="anonymous">
<meta name="viewport" content = "width=device-width, initial-scale=1.0">
</head>
<style>
.row {
display: flex;
justify-content: space-between;
}
.column {
flex: 33%;
padding: 10px;
}
</style>
<body style="background: white">
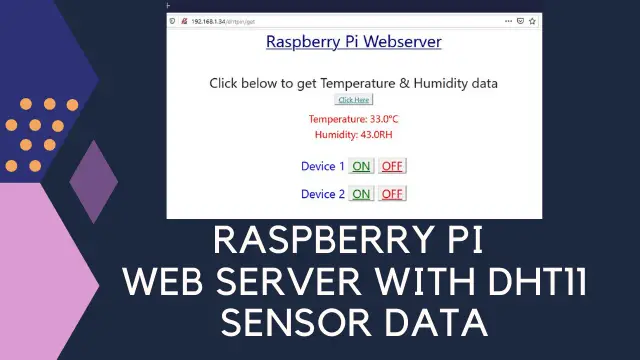
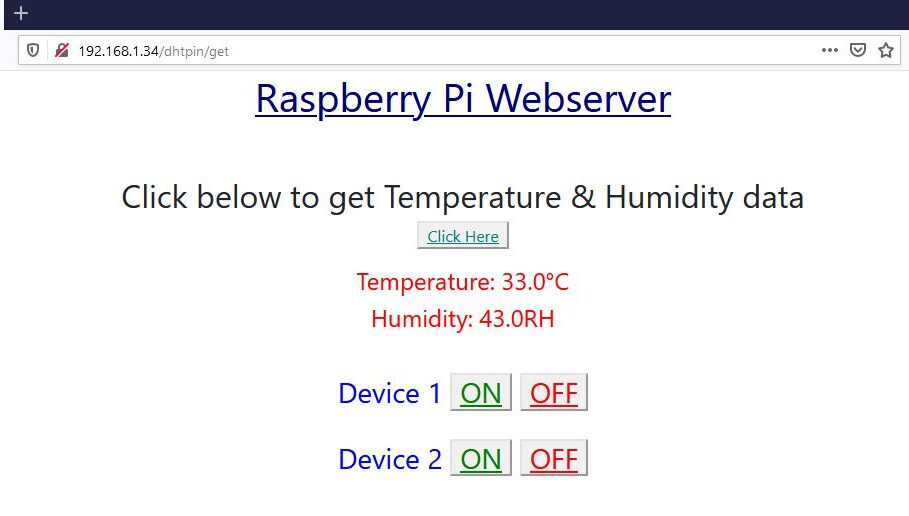
<h1 align="center"; style="color: navy"><u>Raspberry Pi Webserver</u></h1>
<br>
<br>
<h2 align="center"> Click below to get Temperature & Humidity data </h2>
<p align="center"><button><a href="/dhtpin/get" style="color: teal"> Click Here </a></button></p>
<h4 align="center"; style="color: red"> {{ temperature }} &deg;C</h4>
<h4 align="center"; style="color: red"> {{ humidity }} RH</h4>
<br>
<div align="center">
<div class="column">
<h3 style="color: blue">Device 1
<button>
<a href="/pin1/on" style="color: green"> ON</a>
</button>
<button>
<a href="/pin1/off" style="color: red"> OFF</a>
</button>
</h3>
</div>
<div class="column">
<h3 style="color: blue">Device 2
<button>
<a href="/pin2/on" style="color: green"> ON</a>
</button>
<button>
<a href="/pin2/off" style="color: red"> OFF</a>
</button>
</h3>
</div>
</div>
</body>
</html>
Construction and Testing
Connect the components as per the connection diagram and now we are ready to test our project.
sudo python RPI_webserver.py
After executing above command, place the raspberry pi IP address in your mobile or computer browser and press enter. Make sure all your devices should be connected over same network. You will see the webpage of your web server showing up.
Some more Interesting Projects:
- Temperature Monitoring with ESP-DASH Webserver
- Wemos D1 Mini Web Server based Servo Motor Control
- ESP8266 Web Server for Controlling Electrical Devices
- Raspberry Pi Temperature Logger DS18B20
- DHT11 Data Logger using Raspberry Pi and Python code
- Important Tips to Improve Security of your Raspberry Pi
- Controlling ESP32 via Bluetooth using Blynk
- Raspberry Pi PICO with Thonny IDE
Conclusion
This is a simple tutorial to demonstrate how we can build a raspberry pi based web server using flask framework. This project doesn’t need any active internet to work as it will be work locally. This requires less components and devices. If you are a beginner and willing to learn this kind of project then please give a try.


at the terminal i get this error:
File “/home/pi/pruebasensor/flask_webserver/RPI_webserver.py”, line 40, in action
humi = ‘{0:0.1f}’ .format(humi)
ValueError: Unknown format code ‘f’ for object of type ‘str’
Kindly check the Indentation in python code. Hope you have installed the required libraries
i´ve installed all te libraries of this post
user@lake:~$ python3
Python 3.8.10 (default, Mar 15 2022, 12:22:08)
[GCC 9.4.0] on linux
Type “help”, “copyright”, “credits” or “license” for more information.
>>> humi = 23.5678
>>> humi = ‘{0:0.1f}’ .format(humi)
>>> print (humi)
23.6
>>>
Good walkthrough, may be a little out of date or something though, I had to do a few tweaks to get it working as of Nov 2021. First, code in zip file was wrong, but copy and paste code worked. Second, had to install the CircuitPython-DHT library:
pip3 install adafruit-circuitpython-dht
sudo apt-get install libgpiod2
Once that was done everything worked like a charm.
When l execute the code the led is okay but the temp et humidi there nothong on the screen without any errors messages the value of http get is 200.
Kindly check the connections
how can I convert the C to F
Please use C to F formula in the code