Weather Station with BMP280 sensor and Raspberry Pi Pico
We have seen several weather stations which can be built using Arduino, Raspberry Pi, ESP8266 and many other development boards. There are several other sensors which can be used to build a weather station. In this tutorial we will learn building a Weather Station with BMP280 Sensor and Raspberry Pi Pico. We will be using Micro Python code to run this weather station and display the data in a LCD display.
Things Required
To build this project you need below modules
- Raspberry Pi PICO x 1
- BMP280 Sensor Module x 1
- LCD 16×2 (I2C Supported) x 1
- Jumper Cables
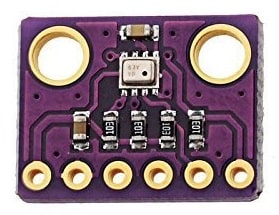
BMP280 Sensor
This sensor manufactured by Bosch. It is the next generation upgrade to the popular BMP085/BMP180/BMP183 sensor. BMP280 is a Barometric Pressure and Altitude Sensor. It has the ability to communicate using I2C/SPI protocol. This is available in a module for easy interfacing. It is one of the cheapest and tiny atmospheric Sensor breakout available in the market.
This precision sensor can sense the pressure with ±1 hPa absolute accuracy and temperature with ±1.0°C accuracy. The pressure changes with altitude and the pressure measurements are very precise in this module. This sensor can be used to measure altitude. This can work as an altimeter with ±1 meter accuracy.
The size of this module is very small and compact. This sensor can measure barometric pressure and temperature. This BMP280 sensor module can be used for monitoring indoor/outdoor conditions, weather forecasting, home automation. This sensor can be used for personal health and wellness monitoring.
For altitude sensing, this sensor gives a low altitude noise of 0.25m with fast conversion time. I2C interface makes this sensor module easy to connect with other boards. Multiple sensors should be connected using SPI protocol as I2C might create address collisions.
Specifications and Features
- Measures temperature, atmospheric pressure and approximate altitude data
- Enhancement of GPS navigation
- Indoor navigation (floor detection, elevator detection)
- Outdoor navigation, leisure and sports applications
- Weather forecast and Health care applications
- Libraries and tutorials available for Arduino and other microcontrollers
- Operating Voltage: 1.71V to 3.6V – would typically be operated from 3.3V
- Operating Temperature: -40 to +85 deg. Celsius (full accuracy between 0 and +65 deg. C)
- Peak current: 1.12mA
- Operating Pressure: 300 hPa to 1100 hPa
- Accuracy between 700 to 900hPa and 25 to 40 deg. C: ±0.12hPa and ±1.0m
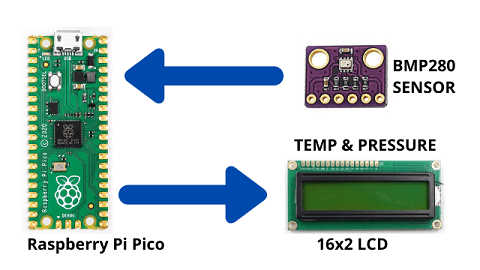
Working
The BMP280 sensor measures the Temperature and atmospheric pressure. We can also calculate altitude using these data. Then the data is sent to Raspberry Pi PICO and from there it is displayed using LCD display.
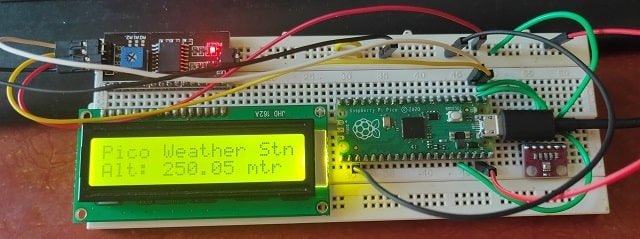
Connection Diagram
The connection is quite simple and easy to connect over a breadboard.
PICO | BMP280 | LCD |
PIN36 / PIN39 | VIN | VCC |
PIN 18 | GND | GND |
PIN 2 | SCL | SCL |
PIN 1 | SDA | SDA |

Code Analysis
We will focus on the major part of the codes to understand how it works.
First we are going to call the required libraries with below line of code
# import the required libraries
from bmp280 import *
from machine import Pin, I2C
import utime
from time import sleep
from lcd_api import LcdApi
from pico_i2c_lcd import I2cLcd
Now we will initialize LCD and configure I2C connectivity.
i2c = I2C(0, sda = Pin(0), scl = Pin(1), freq = 400000)
lcd = I2cLcd(i2c, 0x27, 2, 16)
Below code will configure the BMp280 sensor module connectivity
sclPin = Pin(1) # serial clock pin
sdaPin = Pin(0) # serial data pin
We will also initialize I2C for BMP280 sensor module
i2c_object = I2C(0, scl = sclPin,sda = sdaPin, freq = 1000000)
Below piece of code will Measure the temperature and send it
def altitude_HYP(hPa , temperature):
temperature = temperature
local_pressure = hPa
sea_level_pressure = 1013.25 # hPa
pressure_ratio = sea_level_pressure/local_pressure # sea level pressure = 1013.25 hPa
h = (((pressure_ratio**(1/5.257)) - 1) * temperature ) / 0.0065
return h
Similarly pressure will be measured and sent.
def altitude_IBF(pressure):
local_pressure = pressure # Unit : hPa
sea_level_pressure = 1013.25 # Unit : hPa
pressure_ratio = local_pressure / sea_level_pressure
altitude = 44330*(1-(pressure_ratio**(1/5.255)))
return altitude
Final Code
You can download the code from below link and unzip it in a folder. There will be 4 python files present in the zip. Open these files in Thonny IDE and connect you PICO board to upload these files.

BMP280.py is for bmp280 sensor modules, lcd_api.py is used for display the data in LCD. pico_i2c_lcd.py is used for connecting the LCD using I2C protocol with Raspberry Pi PICO. Main.py is contains the main code of this project. You need to upload all these 4 files in Raspberry Pi Pico. To upload the file you can visit the article below.
Raspberry Pi PICO with Thonny IDE
Building & Testing
Once we have connected the components and modules as per the diagram above, its time to test it. Make sure the code is already uploaded. After powering on the Raspberry Pi PICO it will execute the code and show the temperature, pressure and altitude on LCD display.
More interesting projects:
- IoT Pulse Oximeter Using NodeMCU MAX30100 & Blynk
- DIY Digital clock with RTC DS1307 and Raspberry Pi PICO
- IoT Security Camera using ESP32-Cam Blynk and PIR Sensor
- Reading built in Temperature sensor values of Raspberry Pi PICO
- ESP8266 based IoT Panic Alarm for Old Age People using Blynk
- How to send sensor data to Thingspeak using Raspberry Pi
- ESP32-CAM based Email Notification System
- Raspberry Pi Pico vs Arduino Which one to choose?
- ESP32 based Gas Leakage Detection using Email Notification
- IoT based Motion Detection Alarm using ESP8266 and Blynk
- IoT based Fire Security Alarm System using NodeMCU
- IoT Vehicle Parking System using ESP8266 and Blynk
- NTP Digital Clock using ESP8266 and OLED Display
- DHT11 Sensor with ESP-NOW and ESP32
- Raspberry Pi Flask Web Server with DHT11
Summary
In this tutorial we have learnt building a Weather Station with BMP280 Sensor and Raspberry Pi Pico board. We have interfaced a LCD and a BMP280 temperature and pressure sensor with a Pico board. It is based om RP2040 based microcontroller. We have used micro python code to run this project. Do try this project and don’t forget to share the article with others.
I have all the components as shown above and downloaded the required Python modules, however, I keep getting an error in lines 97 and 126 in the BMP280.py. I run each module separately, with no error in the terminal until I run main.py when the other modules are imported and methods called.
Hi,
Please check the indent in code and check for proper wiring.
I also get an error Pico W. Googled all over and can’t find a reason.
I2C scan result : [39, 118]
I2C connection successfull
Traceback (most recent call last):
File “”, line 44, in
File “bmp280.py”, line 97, in __init__
File “bmp280.py”, line 126, in _read
OSError: [Errno 5] EIO